Slides and Sample Code from CodeMash 2020

Last month, I had the pleasure of delivering a four-hour SwiftUI workshop and two talks at CodeMash, one of my favorite conferences to attend. The talks were recorded, so I will eventually have video from them, but for now, here are the slides and the sample code from them.

Building Declarative UI with SwiftUI

In this workshop, we built Timeato, a pomodoro timer app for iOS, watchOS, macOS, tvOS, and iPadOS. You can find the code on GitHub.

A Mobile App Success Starter Pack

This talk was less technology-focused and more on the things you can do to make a mobile app shine. You can find the slides on Speaker Deck.

Straying From the Happy Path: Taking Control of Errors in Swift

This talk focused on error handling in Swift, and how we got to the state of the art. You can find the slides on Speaker Deck.

Thanks to everyone who came out to my talks! It was a grueling week of public speaking, but I had a lot of fun!

UIAppearance and the Case of the Missing Method

Apple’s UIAppearance API is a great way to customize the look and feel of your iOS app. In one fell swoop, you can achieve common goals like styling the navigation bar across your entire app, setting custom fonts, and the like. You can even use it to style your own custom classes! However, I recently ran into a common issue with the protocol that left me wanting more.

Take the above example of styling a navigation bar. Here’s a code sample that produces a green navigation bar with a custom font:

typealias LaunchOptions = [UIApplication.LaunchOptionsKey: Any]

func application(
    _ application: UIApplication,
    didFinishLaunchingWithOptions launchOptions: LaunchOptions?
) -> Bool {
    UINavigationBar.appearance().barTintColor = .systemGreen
    UINavigationBar.appearance().barStyle = .black
    UINavigationBar.appearance().tintColor = .systemGreen
    UINavigationBar.appearance().titleTextAttributes = [
        NSAttributedString.Key.font: UIFont(name: "Marker Felt", size: 24)!
    ]
    
    return true
}

This produces this beautiful UI:

Our custom-styled navigation bar has a green background and a custom font.

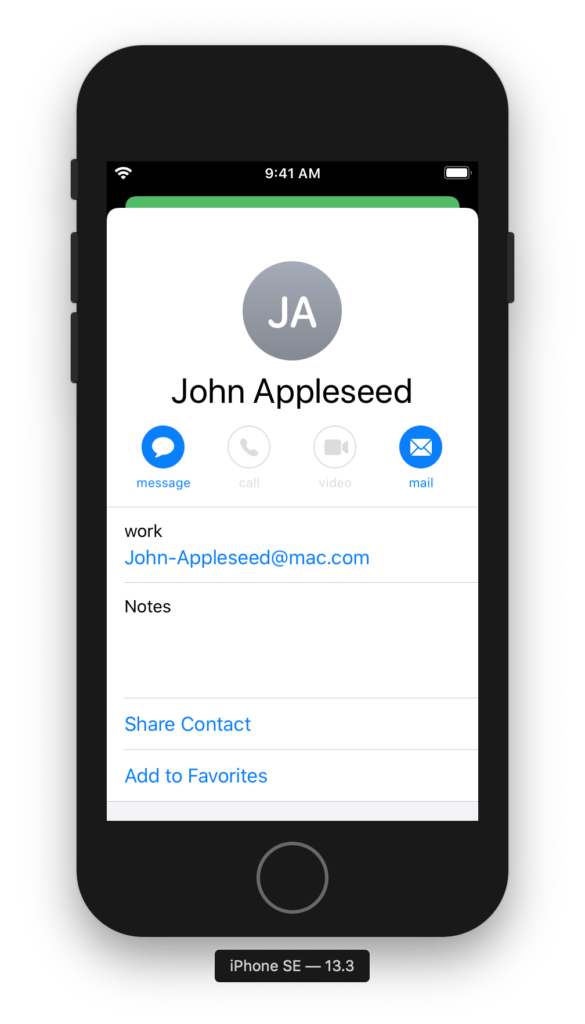
Looks perfect! This can cause problems, however, when we go to use system controls that also use UINavigationBar. Let’s add a button that brings up some system UI:

@IBAction func userTappedShowContact(_ sender: UIButton) {
    let contact = CNMutableContact()
    contact.givenName = "John"
    contact.familyName = "Appleseed"
    contact.emailAddresses = [
        CNLabeledValue(label: "work", value: "John-Appleseed@mac.com")
    ]
    
    let viewController = CNContactViewController(forUnknownContact: contact)
    
    viewController.allowsEditing = false
    viewController.isEditing = false
    
    let navigationController = UINavigationController(
        rootViewController: viewController
    )
    
    present(navigationController, animated: true, completion: nil)
}

Because we’ve already customized UINavigationBar, this displays with the same green background:

The system UI now also has that same custom style.

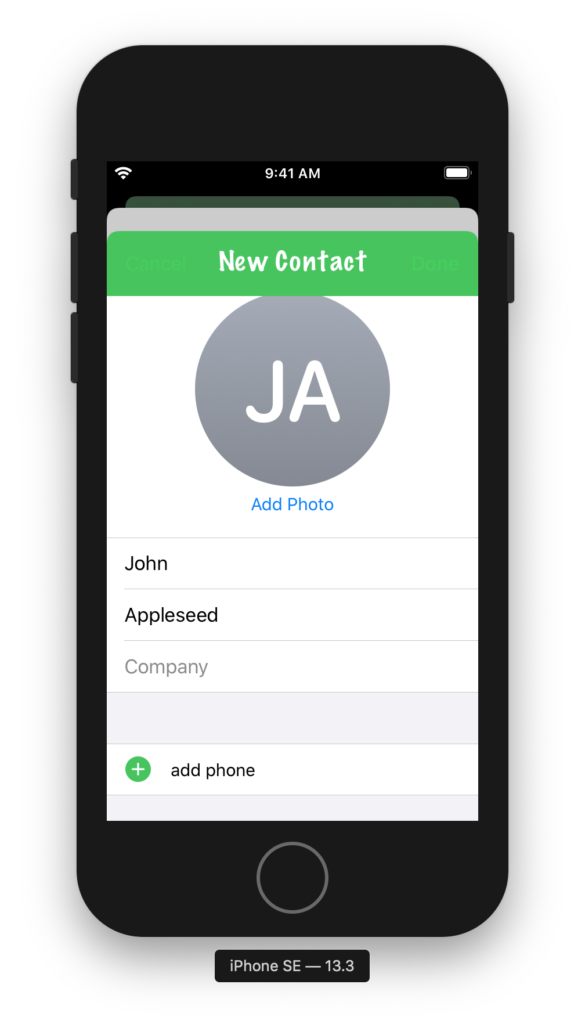
What’s worse is when you tap on “Create New Contact,” which brings up its own modal navigation controller. The tint color and background color are too close, making the bar button items nearly unreadable:

On the “New Contact” screen, the background color and tint color combine to make ugly green-on-green text that’s hard to read.

Trying to find a way around this, I tried a few different options, but nothing really worked the way I wanted it to. You can use the method appearance(whenContainedInInstancesOf:) to get an appearance proxy that only applies for certain containers, but as the “New Contact” screen is created by the system, it’ll always use a standard UINavigationController. What I really wanted was a way to reset the state of the appearance proxy for this class, display the system UI, and then restore my customizations when this was done. Unfortunately the appearance proxies, since they appear as the same class as the view you’re customizing, don’t have a reset() method. So, I built that.

We’re only using the “legacy customizations” for UINavigationBar, as our app supports iOS 12 and therefore can’t use the new options, so I wrote a method to restore each of these values to their defaults. When you’re done, simply call the returned closure and your custom settings will be restored:

extension UIAppearance {
    typealias DefaultAppearanceResetHandler = () -> Void
}

extension UINavigationBar {
    
    /// Resets the navigation bar’s appearance proxy to the default settings.
    /// Returns a closure to execute to restore the current settings. 
    static func resetToDefaultAppearance() -> UIAppearance.DefaultAppearanceResetHandler {
        let appearanceProxy = appearance()
        
        // The following settings are all part of the “legacy customizations”
        // for UINavigationBar’s appearance:
        // https://developer.apple.com/documentation/uikit/uinavigationbar/legacy_customizations
        //
        // First, we store the current values, then we reset them to their
        // defaults.
        
        // Setting the Bar’s Style
        let barStyle = appearanceProxy.barStyle
        
        // Configuring the Title
        let titleTextAttributes = appearanceProxy.titleTextAttributes
        let largeTitleTextAttributes = appearanceProxy.largeTitleTextAttributes
        
        let titleVerticalPositionAdjustments: [UIBarMetrics: CGFloat] = UIBarMetrics.allCases.reduce(into: [:]) { (result, metrics) in
            result[metrics] = appearanceProxy.titleVerticalPositionAdjustment(for: metrics)
        }
        
        // Configuring Bar Button items
        let tintColor = appearanceProxy.tintColor
        
        // Configuring the Back Button
        let backIndicatorImage = appearanceProxy.backIndicatorImage
        let backIndicatorTransitionMaskImage = appearanceProxy.backIndicatorTransitionMaskImage
        
        // Changing the Background
        let barTintColor = appearanceProxy.barTintColor
        
        let backgroundImages: [UIBarMetrics: UIImage] = UIBarMetrics.allCases.reduce(into: [:]) { (result, metrics) in
            result[metrics] = appearanceProxy.backgroundImage(for: metrics)
        }
        
        let backgroundImagesForBarPosition: [UIBarPosition: [UIBarMetrics: UIImage]] =
            UIBarPosition.casesForNavigationBarBackgroundImage.reduce(into: [:]) { (result, position) in
                result[position] = UIBarMetrics.allCases.reduce(into: [:]) { (result, metrics) in
                    result[metrics] = appearanceProxy.backgroundImage(
                        for: position,
                        barMetrics: metrics
                    )
                }
        }
        
        // Adding a Shadow
        let shadowImage = appearanceProxy.shadowImage
        
        // Now we reset the values to their defaults.
        appearanceProxy.barStyle = .default
        appearanceProxy.titleTextAttributes = nil
        appearanceProxy.largeTitleTextAttributes = nil
        
        UIBarMetrics.allCases.forEach { metrics in
            appearanceProxy.setTitleVerticalPositionAdjustment(0, for: metrics)
        }
        
        appearanceProxy.tintColor = nil
        appearanceProxy.backIndicatorImage = nil
        appearanceProxy.backIndicatorTransitionMaskImage = nil
        appearanceProxy.barTintColor = nil
        
        UIBarMetrics.allCases.forEach { metrics in
            appearanceProxy.setBackgroundImage(nil, for: metrics)
        }
        
        UIBarPosition.casesForNavigationBarBackgroundImage.forEach { position in
            UIBarMetrics.allCases.forEach { metrics in
                appearanceProxy.setBackgroundImage(nil,
                                                   for: position,
                                                   barMetrics: metrics)
            }
        }
        
        appearanceProxy.shadowImage = nil
        
        // The block that we return will restore the customizations that were
        // on the appearance proxy when this method first started.
        return {
            appearanceProxy.barStyle = barStyle
            appearanceProxy.titleTextAttributes = titleTextAttributes
            appearanceProxy.largeTitleTextAttributes = largeTitleTextAttributes
            
            titleVerticalPositionAdjustments.forEach { (metrics, value) in
                if value != 0 {
                    appearanceProxy.setTitleVerticalPositionAdjustment(value,
                                                                       for: metrics)
                }
            }
            
            appearanceProxy.tintColor = tintColor
            appearanceProxy.backIndicatorImage = backIndicatorImage
            appearanceProxy.backIndicatorTransitionMaskImage = backIndicatorTransitionMaskImage
            appearanceProxy.barTintColor = barTintColor
            
            backgroundImages.forEach { (metrics, image) in
                appearanceProxy.setBackgroundImage(image, for: metrics)
            }
            
            backgroundImagesForBarPosition.forEach { (position, images) in
                images.forEach { (metrics, image) in
                    appearanceProxy.setBackgroundImage(image,
                                                       for: position,
                                                       barMetrics: metrics)
                }
            }
            
            appearanceProxy.shadowImage = shadowImage
        }
    }
    
}

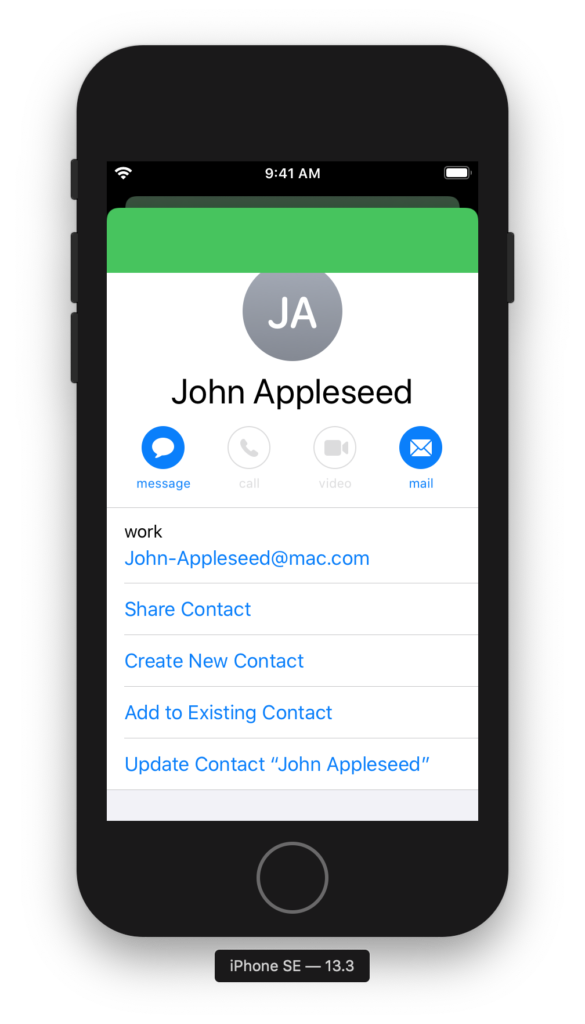
Now, simply call this method, present your system UI, and then restore your original style when it’s done—and your system UI will look as it’s supposed to:

The system UI now appears as designed when displayed over our custom UI.

Obviously, this is a lot of code, but as there’s no built-in way to reset to a standard UIAppearance, this is the best I could do for now. You’d have to write one of these for every UIKit class that’s giving you problems in system UI, but this approach lets you have your UI customization cake and eat it too.

Running Real Tests on watchOS

Since the first release of watchOS, it’s been a unique platform among Apple’s in that Xcode doesn’t support running unit test targets for it. This is of course a hindrance to writing maintainable code for the watch; with no tests, there’s a lot of manual testing involved. It’s hard to even debug some aspects of watch code—since the debugger requires the watch to be connected to the iPhone, which is in turn connected to the Mac via USB, you can’t debug a watch app’s behavior when it’s disconnected from the phone.

There have been efforts to allow limited testing of WatchKit code, but so far everything I’ve seen has one crucial flaw: the tests are actually running on iOS, either by testing a shared framework or by simulating WatchKit on iOS. This is all well and good, and certainly better than nothing, but it doesn’t allow you to test any platform-specific code. Inspired by other efforts to make cross-platform frameworks well-tested, I wondered what it would take to run actual tests on watchOS.

A Tale of Two XCTests

Much like PivotalCoreKit re-implements some of WatchKit to let an iOS target use it, my first thought was to re-implement some of XCTest to get existing test code to build under watchOS. As I dug through XCTest, however, I realized that it’s actually a pretty complex framework, and a complete reimplementation doesn’t make sense when Apple has already begun the task and has a perfectly good open-source repository just sitting there waiting to be used.

To use Apple’s XCTest reimplementation, I first had to create a podspec file to allow CocoaPods to set up my Xcode project. It looks like so:

Pod::Spec.new do |s|
  s.name         = "XCTest"
  s.version      = "3.0.1"
  s.summary      = "A watchOS compilation of Apple’s open-source XCTest."

  s.description  = <<-DESC
            A watchOS compilation of Apple’s open-source XCTest.
                   DESC

  s.homepage     = "https://github.com/apple/swift-corelibs-xctest"
  s.license      = "Apache License, Version 2.0"
  s.author    = "Apple"

  s.watchos.deployment_target = "3.0"

  s.source       = { :git => "https://github.com/apple/swift-corelibs-xctest.git", :tag => "swift-" + s.version.to_s + "-RELEASE" }

  s.source_files  = "Sources/**/*.swift"

  s.framework  = "Foundation"

  s.prepare_command = <<-CMD
                        find Sources/ -type f -name "*.swift" | xargs sed -e 's/import SwiftFoundation/import Foundation/g' -i ""
                        sed -i "" -e 's/usingBlock:/using:/' Sources/XCTest/Public/XCTestCase+Asynchronous.swift
                      CMD
end

While this is a fairly straightforward podspec, I did two interesting things in its prepare_command to get it to work:

  • Because the version I’m targeting uses the also-open-source SwiftFoundation instead of just Foundation, I use sed to change the import statement to point at regular Foundation. This has since been fixed, so this part will become unnecessary.
  • I used sed again to fix a method that had been renamed since this tag was created.

The prepare_command part of a podspec is often-overlooked as a way to fix up a pod without making a fork of your own to maintain.

Now that I had a version of XCTest that would build for watchOS, I set up a new target in my Xcode project called “WatchTests Test Runner WatchKit App” (with a corresponding WatchKit Extension target). This target does what it says on the tin: run it to run the tests. The Xcode project also has an iOS unit test target, and the goal is to share those tests with watchOS, so I simply linked the test files with the new WatchKit extension. When those files use import XCTest, they’ll be pulling from the Swift version automatically.

Running The Tests

To run the tests, you call XCTMain() with an array of XCTestCaseEntry objects that represent the test classes you’d like to test. As of right now, however, it’s still a goal of the Swift XCTest project to enable test method discovery without the Objective-C runtime, which means we need to do it. The easiest way is for each test class to implement a property called allTests, wherein you manually enumerate test methods. The final Swift test class might look something like this:

import XCTest

class WatchTestsTests: XCTestCase {
    
    #if os(watchOS)
    static var allTests = {
        return [
            ("testPassingTest", testPassingTest),
        ]
    }()
    #endif
    
    func testPassingTest() {
        XCTAssertTrue(true)
    }
    
}

This test can be compiled on iOS and watchOS. The extension delegate of the test runner WatchKit App then runs the tests:

import WatchKit
import XCTest

class ExtensionDelegate: NSObject, WKExtensionDelegate {

    func applicationDidFinishLaunching() {
        XCTMain([testCase(WatchTestsTests.allTests)])
    }
    
}

XCTMain will call exit with an exit status, so you can see the results in Xcode’s console:

Test Suite 'All tests' started at 22:36:14.852
Test Suite 'WatchTestsTestRunner WatchKit Extension.appex.xctest' started at 22:36:14.854
Test Suite 'WatchTestsTests' started at 22:36:14.854
Test Case 'WatchTestsTests.testPassingTest' started at 22:36:14.854
Test Case 'WatchTestsTests.testPassingTest' passed (0.001 seconds).
Test Suite 'WatchTestsTests' passed at 22:36:14.856
     Executed 1 test, with 0 failures (0 unexpected) in 0.001 (0.001) seconds
Test Suite 'WatchTestsTestRunner WatchKit Extension.appex.xctest' passed at 22:36:14.856
     Executed 1 test, with 0 failures (0 unexpected) in 0.001 (0.001) seconds
Test Suite 'All tests' passed at 22:36:14.856
     Executed 1 test, with 0 failures (0 unexpected) in 0.001 (0.001) seconds
Program ended with exit code: 0

As you can see, this is exactly what you’d get out of XCTest on iOS, except it’s running in a watchOS target!

Limitations

This trivial example works well, but there are some limitations with this approach:

  • Because I’m using the Swift implementation of XCTest, the only existing tests that could possibly run are those written in Swift. You have to subclass XCTestCase to use XCTest, and you can’t make an Objective-C subclass of a Swift class, so for now at least, no Objective-C tests can run on watchOS. If Swift and Objective-C interoperability improves to the point where you can subclass a Swift class in Objective-C, look for this to improve. Alternatively, XCTestCase could be a protocol exposed to Objective-C, which would allow more flexibility in that regard.
  • Since we’re just running the tests directly, we don’t get any fancy Xcode integration. Failed tests won’t color a line red, nor will they run when you press ⌘U.
  • Our XCTestCase subclasses are in a unique position: they are subclasses of an Objective-C class on iOS, and subclasses of a Swift class on watchOS. This can confuse the compiler and leave you without code completion.

Nevertheless, I’m excited to start tinkering with tests on watchOS. I have a couple areas I’d like to explore:

  • Integrating these tests with CI of some sort. If I can get a shell script to return the watch target’s exit status, then I can get a Jenkins or Travis build to fail if the watch tests fail.
  • Testing the watch UI further. Right now the shared WKExtension’s rootInterfaceController property is nil during testing. Waiting for the UI to load before calling XCTMain() will probably help here.

I’d love to hear suggestions or feedback on this. The more tests are written for watchOS, the better and more maintainable our watch apps will be! If you want to poke around with my code, you can find it on GitHub.

Developing for Apple Watch

After a long time of writing, my second book has been published! Developing for Apple Watch is now available from the Pragmatic Bookshelf in both paper and eBook formats! This is a “Pragmatic exPress” book, meaning it’s a shorter look at a specific technology. It’s also available on Amazon if you’d prefer it that way.jkwatch

The book introduces WatchKit, Apple’s technology for making Apple Watch apps. With 100% of its code in Swift, you’ll be ready to go with the latest Apple technology. Get it now and get a head start on making watch apps before WWDC!

Slides: Understanding Objective-C Inside and Out from CodeMash 2014

I braved the polar vortex to come down to Sandusky, OH for the always-amazing CodeMash conference. I gave a talk about Objective-C’s underpinnings in C and the like. You can find the slides on SpeakerDeck, and the slides and code on the unofficial GitHub repository for the conference. Thanks for coming, everyone!