Apple’s UIAppearance API is a great way to customize the look and feel of your iOS app. In one fell swoop, you can achieve common goals like styling the navigation bar across your entire app, setting custom fonts, and the like. You can even use it to style your own custom classes! However, I recently ran into a common issue with the protocol that left me wanting more.
Take the above example of styling a navigation bar. Here’s a code sample that produces a green navigation bar with a custom font:
typealias LaunchOptions = [UIApplication.LaunchOptionsKey: Any]

func application(
    _ application: UIApplication,
    didFinishLaunchingWithOptions launchOptions: LaunchOptions?
) -> Bool {
    UINavigationBar.appearance().barTintColor = .systemGreen
    UINavigationBar.appearance().barStyle = .black
    UINavigationBar.appearance().tintColor = .systemGreen
    UINavigationBar.appearance().titleTextAttributes = [
        NSAttributedString.Key.font: UIFont(name: "Marker Felt", size: 24)!
    ]

    return true
}
This produces this beautiful UI:

Looks perfect! This can cause problems, however, when we go to use system controls that also use UINavigationBar. Let’s add a button that brings up some system UI:
@IBAction func userTappedShowContact(_ sender: UIButton) {
    let contact = CNMutableContact()
    contact.givenName = "John"
    contact.familyName = "Appleseed"
    contact.emailAddresses = [
        CNLabeledValue(label: "work", value: "John-Appleseed@mac.com")
    ]

    let viewController = CNContactViewController(forUnknownContact: contact)

    viewController.allowsEditing = false
    viewController.isEditing = false

    let navigationController = UINavigationController(
        rootViewController: viewController
    )

    present(navigationController, animated: true, completion: nil)
}
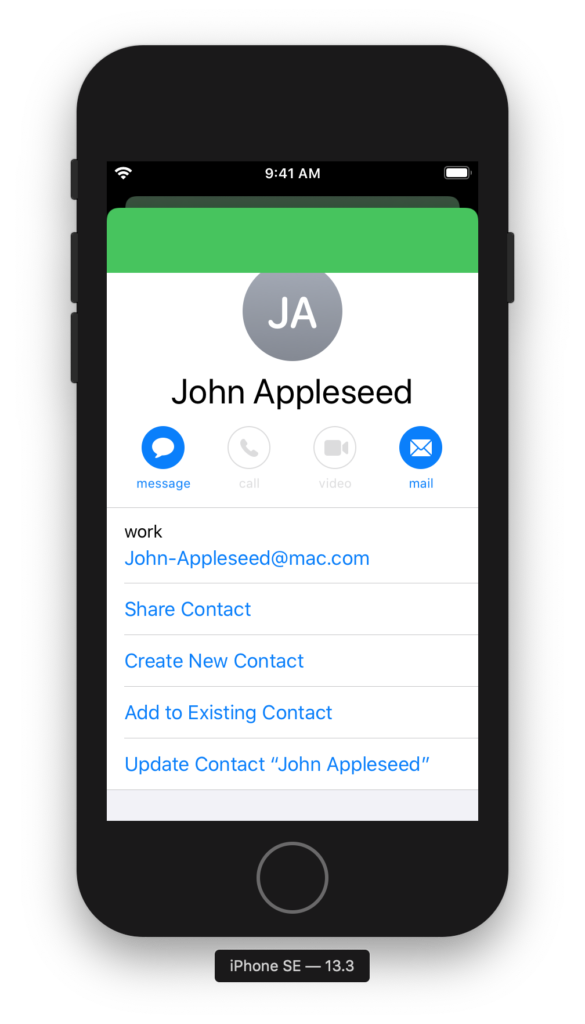
Because we’ve already customized UINavigationBar, this displays with the same green background:

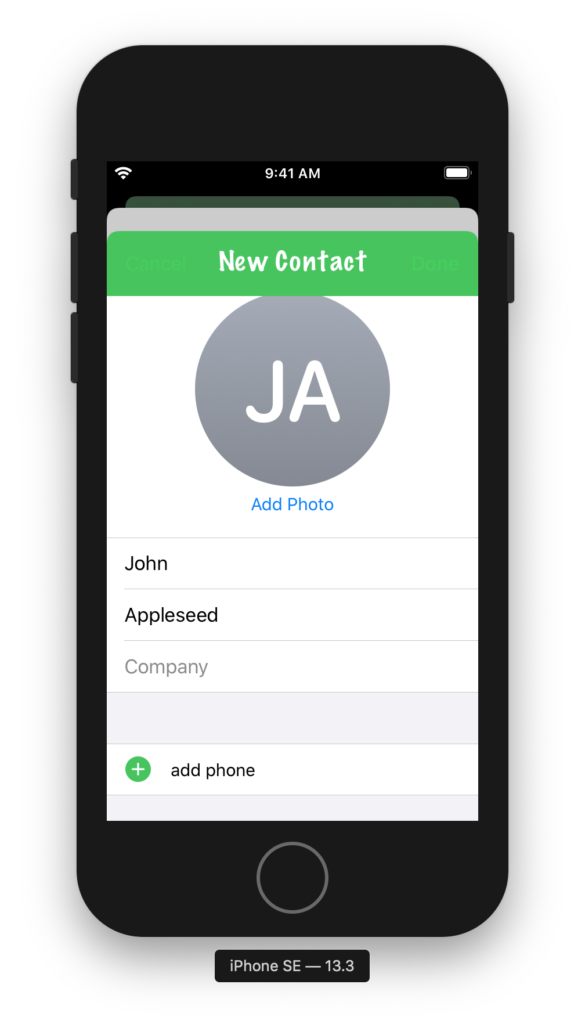
What’s worse is when you tap on “Create New Contact,” which brings up its own modal navigation controller. The tint color and background color are too close, making the bar button items nearly unreadable:

Trying to find a way around this, I tried a few different options, but nothing really worked the way I wanted it to. You can use the method appearance(whenContainedInInstancesOf:) to get an appearance proxy that only applies for certain containers, but as the “New Contact” screen is created by the system, it’ll always use a standard UINavigationController. What I really wanted was a way to reset the state of the appearance proxy for this class, display the system UI, and then restore my customizations when this was done. Unfortunately the appearance proxies, since they appear as the same class as the view you’re customizing, don’t have a reset() method. So, I built that.
We’re only using the “legacy customizations” for UINavigationBar, as our app supports iOS 12 and therefore can’t use the new options, so I wrote a method to restore each of these values to their defaults. When you’re done, simply call the returned closure and your custom settings will be restored:
extension UIAppearance {
    typealias DefaultAppearanceResetHandler = () -> Void
}

extension UINavigationBar {

    /// Resets the navigation bar’s appearance proxy to the default settings.
    /// Returns a closure to execute to restore the current settings.
    static func resetToDefaultAppearance() -> UIAppearance.DefaultAppearanceResetHandler {
        let appearanceProxy = appearance()

        // The following settings are all part of the “legacy customizations”
        // for UINavigationBar’s appearance:
        // https://developer.apple.com/documentation/uikit/uinavigationbar/legacy_customizations
        //
        // First, we store the current values, then we reset them to their
        // defaults.

        // Setting the Bar’s Style
        let barStyle = appearanceProxy.barStyle

        // Configuring the Title
        let titleTextAttributes = appearanceProxy.titleTextAttributes
        let largeTitleTextAttributes = appearanceProxy.largeTitleTextAttributes

        let titleVerticalPositionAdjustments: [UIBarMetrics: CGFloat] = UIBarMetrics.allCases.reduce(into: [:]) { (result, metrics) in
            result[metrics] = appearanceProxy.titleVerticalPositionAdjustment(for: metrics)
        }

        // Configuring Bar Button items
        let tintColor = appearanceProxy.tintColor

        // Configuring the Back Button
        let backIndicatorImage = appearanceProxy.backIndicatorImage
        let backIndicatorTransitionMaskImage = appearanceProxy.backIndicatorTransitionMaskImage

        // Changing the Background
        let barTintColor = appearanceProxy.barTintColor

        let backgroundImages: [UIBarMetrics: UIImage] = UIBarMetrics.allCases.reduce(into: [:]) { (result, metrics) in
            result[metrics] = appearanceProxy.backgroundImage(for: metrics)
        }

        let backgroundImagesForBarPosition: [UIBarPosition: [UIBarMetrics: UIImage]] =
            UIBarPosition.casesForNavigationBarBackgroundImage.reduce(into: [:]) { (result, position) in
                result[position] = UIBarMetrics.allCases.reduce(into: [:]) { (result, metrics) in
                    result[metrics] = appearanceProxy.backgroundImage(
                        for: position,
                        barMetrics: metrics
                    )
                }
        }

        // Adding a Shadow
        let shadowImage = appearanceProxy.shadowImage

        // Now we reset the values to their defaults.
        appearanceProxy.barStyle = .default
        appearanceProxy.titleTextAttributes = nil
        appearanceProxy.largeTitleTextAttributes = nil

        UIBarMetrics.allCases.forEach { metrics in
            appearanceProxy.setTitleVerticalPositionAdjustment(0, for: metrics)
        }

        appearanceProxy.tintColor = nil
        appearanceProxy.backIndicatorImage = nil
        appearanceProxy.backIndicatorTransitionMaskImage = nil
        appearanceProxy.barTintColor = nil

        UIBarMetrics.allCases.forEach { metrics in
            appearanceProxy.setBackgroundImage(nil, for: metrics)
        }

        UIBarPosition.casesForNavigationBarBackgroundImage.forEach { position in
            UIBarMetrics.allCases.forEach { metrics in
                appearanceProxy.setBackgroundImage(nil,
                                                   for: position,
                                                   barMetrics: metrics)
            }
        }

        appearanceProxy.shadowImage = nil

        // The block that we return will restore the customizations that were
        // on the appearance proxy when this method first started.
        return {
            appearanceProxy.barStyle = barStyle
            appearanceProxy.titleTextAttributes = titleTextAttributes
            appearanceProxy.largeTitleTextAttributes = largeTitleTextAttributes

            titleVerticalPositionAdjustments.forEach { (metrics, value) in
                if value != 0 {
                    appearanceProxy.setTitleVerticalPositionAdjustment(value,
                                                                       for: metrics)
                }
            }

            appearanceProxy.tintColor = tintColor
            appearanceProxy.backIndicatorImage = backIndicatorImage
            appearanceProxy.backIndicatorTransitionMaskImage = backIndicatorTransitionMaskImage
            appearanceProxy.barTintColor = barTintColor

            backgroundImages.forEach { (metrics, image) in
                appearanceProxy.setBackgroundImage(image, for: metrics)
            }

            backgroundImagesForBarPosition.forEach { (position, images) in
                images.forEach { (metrics, image) in
                    appearanceProxy.setBackgroundImage(image,
                                                       for: position,
                                                       barMetrics: metrics)
                }
            }

            appearanceProxy.shadowImage = shadowImage
        }
    }

}
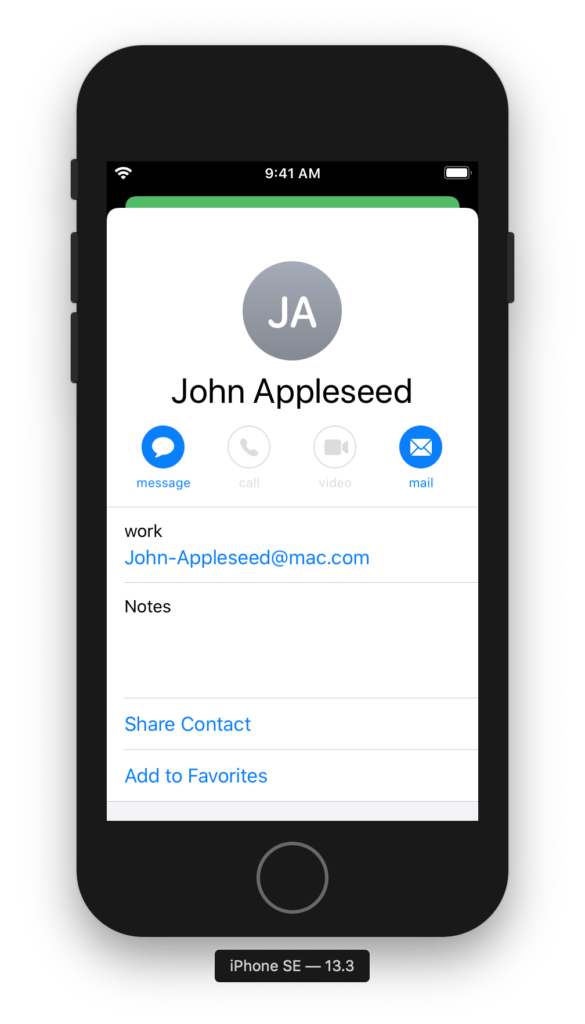
Now, simply call this method, present your system UI, and then restore your original style when it’s done—and your system UI will look as it’s supposed to:

Obviously, this is a lot of code, but as there’s no built-in way to reset to a standard UIAppearance, this is the best I could do for now. You’d have to write one of these for every UIKit class that’s giving you problems in system UI, but this approach lets you have your UI customization cake and eat it too.