Computers are Disgusting

I recently wrote a script to automatically install firmware updates for our Macs. The problem with them is that for some, you have to hold down the power button to finish the installation after the machine has turned itself off. Now I don’t know about you, but I sure as hell don’t want to go around to 900 or so Macs and hold down their power button after installing an update. This script, while it can’t hold down the button for me, does allow student staff to automate the proces up to that point. I don’t have to give them a password they could use to break the system, they can do the update for me, everybody wins. It’s a beautiful system.

Well, today, I was testing the script out. The problem with testing it is that you can only test a given computer once; once the firmware update is installed, it won’t show up as needing to be installed anymore. So, I packed up my stuff and went to our biggest computer lab to do some testing. My test subjects were some “CyberStations,” computers we have with basic web-browsing and e-mail loadsets. They’re relatively unused during the summer, so if I broke any it wouldn’t be a big deal. I went up to one, ran the update, and waited. That’s when smoke came out of the back of the computer as the update ran. Oh shit, I thought, this thing is on fire!

Let’s go back a minute to my description of CyberStations. Their loadset consists of a vanilla Mac OS X Leopard install with some applications taken out, Firefox, Thunderbird, and Adium. Basically, it has the Apple-provided web browser, e-mail client, and IM program, as well as the leading open-source alternative for each. Nothing on these computers is too taxing. As a consequence, the fans never need to run too heavily, as the computer never really gets too hot.

Back to the smoking machine. I was sure it was on fire—where there’s smoke, there’s fire, right? Well, the student employee to whom I was demonstrating the script wasn’t too sure. He placed his hand on the back of the computer (an iMac G5, not that it matters) and didn’t feel any heat. So, if it wasn’t smoke, what was it? That’s when I realized what had happened. The fans, never having been run too hard, hadn’t been blowing a whole lot of dust around. When they ran full speed during the firmware update, dust had come flying out of the computer’s vents. A white, puffy cloud composed largely of the dead skin cells that had fallen off of our users’ skin for years. It was coming out of the bottom, out of the back, and even where the screen met the case. I quickly held my breath and stepped back.

I’m really glad that we have student staff to do the rest of this.

How to Move Your Blog from WordPress.com to DreamHost (Or Other Hosting Companies)

WordPress.com is, don’t get me wrong, a great service.  They offer no-hassle blog hosting for free using WordPress, my blogging platform of choice.  At a certain point in a young blogger’s life, however, it’s time to move on to using WordPress’ more advanced features; uploading new themes, hand-editing theme components, and maybe even throwing Google AdSense on there.  WordPress is always free from WordPress.org, is easy to set up, and very easy to customize and administer.  So, with a little help from blog-well, I was ready to go.  This blog post is a derivation of blog-well’s work (click that link over there to see it), but I’ll be focusing on DreamHost where they focused on GoDaddy.

  1. Step 1: Obtain Hosting.
    Obviously the first step here is to sign up for a hosting account.  DreamHost’s process is simple enough that I won’t bore you with instructions.
  2. Step 2: Tell DNS to point to WordPress.com
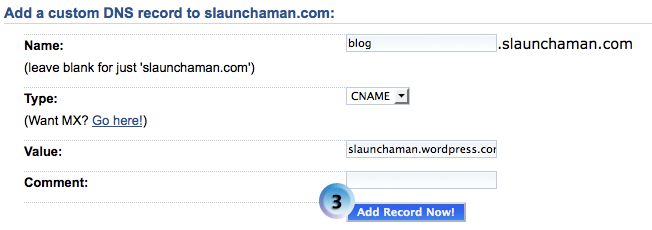
    Now we have to tell your blog’s DNS servers to point to WordPress.com, where your blog is currently. This step might seem counterintuitive—after all, we’re trying to point WordPress.com to your blog, not the other way around—but this is how you let WordPress know that you’re in control of your domain. Assuming that you want your blog at blog.yourdomain.com, you need to make a “CNAME” entry as follows:

    blog 14400 IN CNAME yourblog.wordpress.com

    Once that change propagates (which can take anywhere from a few minutes to a few hours, and you may need to reboot your computer), visitors to blog.yourdomain.com will be redirected to yourblog.wordpress.com. For DreamHost, follow these pictures:

    The first in the dreamhost instructions

  3. Step 3: Sign Up for WordPress.com Domain Forwarding
    This part, unfortunately, costs a little bit of money—$10 per year. When you’re logged in to WordPress.com and at your dashboard, click “Upgrades” and then “Domains.” Enter your new domain in the field once you’ve paid for 10 credits and you’ll see it appear on the domain screen.
  4. Step 4: Tell WordPress.com to Point to Your Domain
  5. In the “Domains” view on your WordPress.com dashboard, click “put blog here” next to your domain. This tells WordPress to take all traffic sent to yourblog.wordpress.com to blog.yourdomain.com or whatever you want.  The end result should look like this:

    Instructions for blog redirection

  6. Step 5: Re-do Your Custom Domain
    Go into your domain’s DNS settings again and delete the CNAME entry you made earlier. Now you’re all set to go! If you’re using DreamHost, you can do the easy install of WordPress to have it automatically updated to the latest version and the database automatically created for you.

Relaunch

I’ve moved this blog over to Dreamhost, which means a couple of things: first, I’m managing my own WordPress installation now, which is pretty cool.  Don’t get me wrong, WordPress.com is great—and I’m still technically using it to forward traffic to my old address here—but managing your own server is pretty cool.  I can install whatever themes I want and edit them as I see fit, without paying money to do so.  Sure, I’m paying money for hosting, the domain name, and the domain name forwarding from WordPress.com, but at least now the blog is here on my own terms.

Moving the blog here was a long and arduous process, one that required patience on my part and that gave me a crash course in DNS for web servers.  I was able to do it mostly off of a post at blog-well.com, and since the attached PDF has rights to edit it built in, I think I’ll work on some instructions for this process to help others along.  Keep your eyes peeled!