The videos from my two talks at CodeMash are now available!
I hate watching myself on video, so let me know if there are any issues with the recordings.
The videos from my two talks at CodeMash are now available!
I hate watching myself on video, so let me know if there are any issues with the recordings.
Last month, I had the pleasure of delivering a four-hour SwiftUI workshop and two talks at CodeMash, one of my favorite conferences to attend. The talks were recorded, so I will eventually have video from them, but for now, here are the slides and the sample code from them.
In this workshop, we built Timeato, a pomodoro timer app for iOS, watchOS, macOS, tvOS, and iPadOS. You can find the code on GitHub.
This talk was less technology-focused and more on the things you can do to make a mobile app shine. You can find the slides on Speaker Deck.
This talk focused on error handling in Swift, and how we got to the state of the art. You can find the slides on Speaker Deck.
Thanks to everyone who came out to my talks! It was a grueling week of public speaking, but I had a lot of fun!
In a previous post, I talked about making your status bar nice when automating your App Store screenshots. These days, images alone are not enough to tell your app’s story. The App Store supports preview videos, and if you’re trying to create one of those for every combination of screen size and language that your app supports, it can be a chore!
Video can also be incredibly effective at presenting your work to others. At Detroit Labs, we pride ourselves in polished demos of our work to our clients. One of the best ways to do that is to embed videos of the app in a slide deck and go over it during the presentation. This avoids awkwardness in live demos and allows the video to loop as the client asks questions (you should also have the code ready to run in case the client asks about something that isn’t in the video).
One downside of these videos is the amount of time it takes to prepare them. If you’re diligent, you can record these videos for each individual pull request, then at the end of a sprint, collect the videos and prepare the presentation from them. Even if that happens, you can still fall out of sync. If pull request A shows some new functionality but is merged before pull request B, which updates the client’s logo to their new branding, their old branding in the video for pull request A will confuse them and distract from the actual feature during the demo. It’s best to compile all of the videos from a single, stable codebase, and deliver that exact code to the client along with the demo so there are no surprises.
Manually running all of the code and capturing video is a chore, especially for large, productive teams. I wanted to figure out a way to automate these video captures, and last week while in my hotel room at CodeMash, I figured out how to do it. Xcode ships with the simctl utility, and you can use it to record video from the command line:
xcrun simctl io <device> recordVideo <options> <path>Once this starts running, it’ll record the given device’s screen to the given file. All we need to do is trigger this command. Unfortunately, the UI tests that Xcode runs run as iOS applications, so we don’t have access to the host Mac to run simctl. That’s where SBTUITestTunnelHost comes in! Using this framework and the associated Mac app, we can pass messages locally from our UI test suite to our Mac. One of the things it can do is execute command-line utilities. This is perfect for our needs… almost.
Because simctl will keep recording video until you hit ^C in Terminal, we need to leave it open. SBTUITestTunelHost, by default, executes a command, waits for it to finish, and then returns. To get around this, I modified the server (and sent a pull request) to enable starting asynchronous commands, then later terminating them. With this in place and running, recording an individual unit test is straightforward! Here’s an example test suite:
import SBTUITestTunnelHost
import XCTest

class InstantReplay_iOSUITests: XCTestCase {

    var commandID: UUID!

    override func setUp() {
        // Put setup code here. This method is called before the invocation of each test method in the class.

        // In UI tests it is usually best to stop immediately when a failure occurs.
        continueAfterFailure = false

        // UI tests must launch the application that they test.
        let app = XCUIApplication()
        app.launch()

        commandID = host.launchCommand(
            "xcrun simctl io booted recordVideo --codec=h264 --mask=black --force /Users/Jeff/Desktop/test.mov"
        )

        _ = app.wait(for: .runningForeground, timeout: 5)

        _ = app.textFields.firstMatch.waitForExistence(timeout: 0.5)

        if let commandID = commandID {
            addTeardownBlock { [unowned self] in
                self.host.interruptCommand(with: commandID)
            }
        }
        else {
            print("No status!")
        }
    }

    func testExample() {
        let app = XCUIApplication()

        app.textFields.firstMatch.tap()

        let keyDelay = { return TimeInterval.random(in: 0...0.15) }

        "UITestExample@example.com".map(String.init).forEach {
            if ["@", "."].contains($0) {
                app.keys["more"].tap()
                XCTAssertTrue(app.keys[$0].waitForExistence(timeout: keyDelay()))
                app.keys[$0].tap()
                app.keys["more"].tap()
            }
            else if $0 == $0.uppercased(), !app.keys[$0].exists {
                app.buttons["shift"].tap()
                XCTAssertTrue(app.keys[$0].waitForExistence(timeout: keyDelay()))
                app.keys[$0].tap()
            }
            else {
                XCTAssertTrue(app.keys[$0].waitForExistence(timeout: keyDelay()))
                app.keys[$0].tap()
            }
        }

        app.buttons["Return"].tap()

        XCTAssertTrue(app.textFields.firstMatch.waitForExistence(timeout: 0.5))
    }

}
This suite will automatically run, perform its tests, and record the output to a video on my Desktop. Sure enough, once I’d given the host app sufficient permissions in macOS Catalina, it worked, and while I was drinking my coffee after pressing ⌘U in Xcode, this video appeared on my desktop:
This is useful for pull requests, demos, embedding videos into Deckset presentations, you name it! Because it’s generating new videos every time, you never have to worry about your demo being out of date, or spending all of your time creating videos for every language you support. Just set it and forget it!
Apple’s UIAppearance API is a great way to customize the look and feel of your iOS app. In one fell swoop, you can achieve common goals like styling the navigation bar across your entire app, setting custom fonts, and the like. You can even use it to style your own custom classes! However, I recently ran into a common issue with the protocol that left me wanting more.
Take the above example of styling a navigation bar. Here’s a code sample that produces a green navigation bar with a custom font:
typealias LaunchOptions = [UIApplication.LaunchOptionsKey: Any]

func application(
    _ application: UIApplication,
    didFinishLaunchingWithOptions launchOptions: LaunchOptions?
) -> Bool {
    UINavigationBar.appearance().barTintColor = .systemGreen
    UINavigationBar.appearance().barStyle = .black
    UINavigationBar.appearance().tintColor = .systemGreen
    UINavigationBar.appearance().titleTextAttributes = [
        NSAttributedString.Key.font: UIFont(name: "Marker Felt", size: 24)!
    ]

    return true
}
This produces this beautiful UI:

Looks perfect! This can cause problems, however, when we go to use system controls that also use UINavigationBar. Let’s add a button that brings up some system UI:
@IBAction func userTappedShowContact(_ sender: UIButton) {
let contact = CNMutableContact()
contact.givenName = "John"
contact.familyName = "Appleseed"
contact.emailAddresses = [
CNLabeledValue(label: "work", value: "John-Appleseed@mac.com")
]
let viewController = CNContactViewController(forUnknownContact: contact)
viewController.allowsEditing = false
viewController.isEditing = false
let navigationController = UINavigationController(
rootViewController: viewController
)
present(navigationController, animated: true, completion: nil)
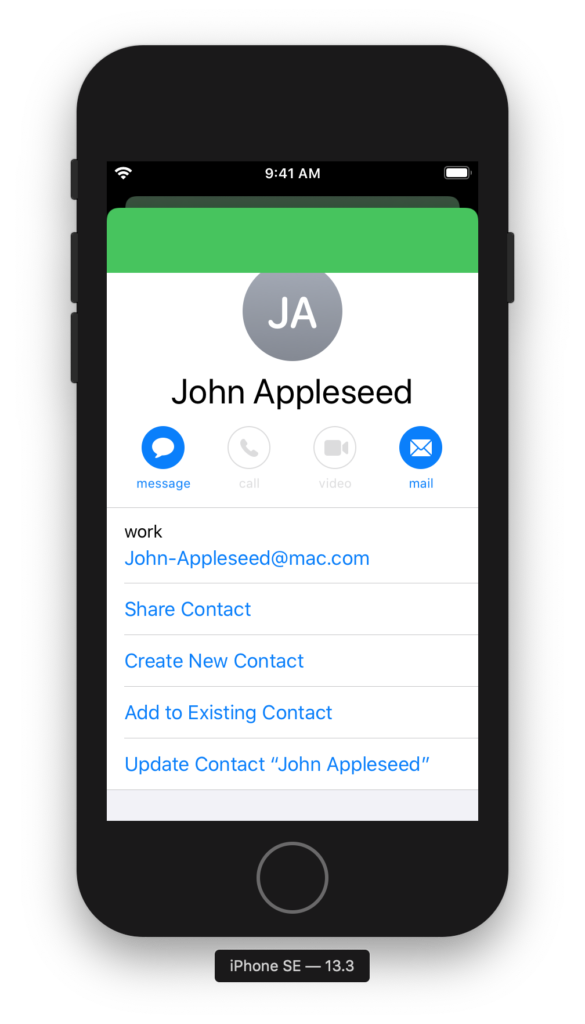
}Because we’ve already customized UINavigationBar, this displays with the same green background:
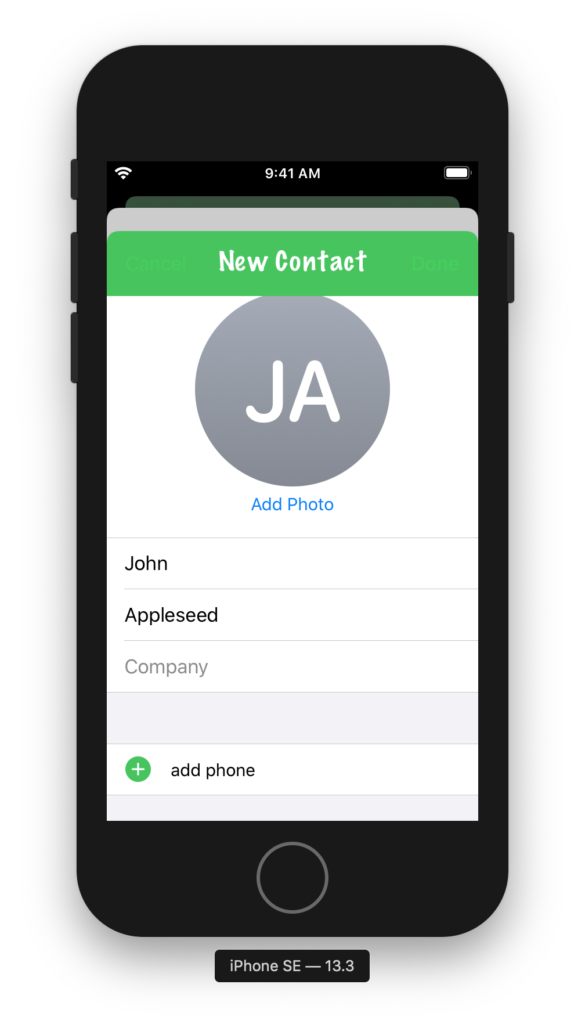
What’s worse is when you tap on “Create New Contact,” which brings up its own modal navigation controller. The tint color and background color are too close, making the bar button items nearly unreadable:
Trying to find a way around this, I tried a few different options, but nothing really worked the way I wanted it to. You can use the method appearance(whenContainedInInstancesOf:) to get an appearance proxy that only applies for certain containers, but as the “New Contact” screen is created by the system, it’ll always use a standard UINavigationController. What I really wanted was a way to reset the state of the appearance proxy for this class, display the system UI, and then restore my customizations when this was done. Unfortunately the appearance proxies, since they appear as the same class as the view you’re customizing, don’t have a reset() method. So, I built that.
We’re only using the “legacy customizations” for UINavigationBar, as our app supports iOS 12 and therefore can’t use the new options, so I wrote a method to restore each of these values to their defaults. When you’re done, simply call the returned closure and your custom settings will be restored:
extension UIAppearance {
    typealias DefaultAppearanceResetHandler = () -> Void
}

extension UINavigationBar {

    /// Resets the navigation bar’s appearance proxy to the default settings.
    /// Returns a closure to execute to restore the current settings.
    static func resetToDefaultAppearance() -> UIAppearance.DefaultAppearanceResetHandler {
        let appearanceProxy = appearance()

        // The following settings are all part of the “legacy customizations”
        // for UINavigationBar’s appearance:
        // https://developer.apple.com/documentation/uikit/uinavigationbar/legacy_customizations
        //
        // First, we store the current values, then we reset them to their
        // defaults.

        // Setting the Bar’s Style
        let barStyle = appearanceProxy.barStyle

        // Configuring the Title
        let titleTextAttributes = appearanceProxy.titleTextAttributes
        let largeTitleTextAttributes = appearanceProxy.largeTitleTextAttributes

        let titleVerticalPositionAdjustments: [UIBarMetrics: CGFloat] = UIBarMetrics.allCases.reduce(into: [:]) { (result, metrics) in
            result[metrics] = appearanceProxy.titleVerticalPositionAdjustment(for: metrics)
        }

        // Configuring Bar Button items
        let tintColor = appearanceProxy.tintColor

        // Configuring the Back Button
        let backIndicatorImage = appearanceProxy.backIndicatorImage
        let backIndicatorTransitionMaskImage = appearanceProxy.backIndicatorTransitionMaskImage

        // Changing the Background
        let barTintColor = appearanceProxy.barTintColor

        let backgroundImages: [UIBarMetrics: UIImage] = UIBarMetrics.allCases.reduce(into: [:]) { (result, metrics) in
            result[metrics] = appearanceProxy.backgroundImage(for: metrics)
        }

        let backgroundImagesForBarPosition: [UIBarPosition: [UIBarMetrics: UIImage]] =
            UIBarPosition.casesForNavigationBarBackgroundImage.reduce(into: [:]) { (result, position) in
                result[position] = UIBarMetrics.allCases.reduce(into: [:]) { (result, metrics) in
                    result[metrics] = appearanceProxy.backgroundImage(
                        for: position,
                        barMetrics: metrics
                    )
                }
        }

        // Adding a Shadow
        let shadowImage = appearanceProxy.shadowImage

        // Now we reset the values to their defaults.
        appearanceProxy.barStyle = .default
        appearanceProxy.titleTextAttributes = nil
        appearanceProxy.largeTitleTextAttributes = nil

        UIBarMetrics.allCases.forEach { metrics in
            appearanceProxy.setTitleVerticalPositionAdjustment(0, for: metrics)
        }

        appearanceProxy.tintColor = nil
        appearanceProxy.backIndicatorImage = nil
        appearanceProxy.backIndicatorTransitionMaskImage = nil
        appearanceProxy.barTintColor = nil

        UIBarMetrics.allCases.forEach { metrics in
            appearanceProxy.setBackgroundImage(nil, for: metrics)
        }

        UIBarPosition.casesForNavigationBarBackgroundImage.forEach { position in
            UIBarMetrics.allCases.forEach { metrics in
                appearanceProxy.setBackgroundImage(nil,
                                                   for: position,
                                                   barMetrics: metrics)
            }
        }

        appearanceProxy.shadowImage = nil

        // The block that we return will restore the customizations that were
        // on the appearance proxy when this method first started.
        return {
            appearanceProxy.barStyle = barStyle
            appearanceProxy.titleTextAttributes = titleTextAttributes
            appearanceProxy.largeTitleTextAttributes = largeTitleTextAttributes

            titleVerticalPositionAdjustments.forEach { (metrics, value) in
                if value != 0 {
                    appearanceProxy.setTitleVerticalPositionAdjustment(value,
                                                                       for: metrics)
                }
            }

            appearanceProxy.tintColor = tintColor
            appearanceProxy.backIndicatorImage = backIndicatorImage
            appearanceProxy.backIndicatorTransitionMaskImage = backIndicatorTransitionMaskImage
            appearanceProxy.barTintColor = barTintColor

            backgroundImages.forEach { (metrics, image) in
                appearanceProxy.setBackgroundImage(image, for: metrics)
            }

            backgroundImagesForBarPosition.forEach { (position, images) in
                images.forEach { (metrics, image) in
                    appearanceProxy.setBackgroundImage(image,
                                                       for: position,
                                                       barMetrics: metrics)
                }
            }

            appearanceProxy.shadowImage = shadowImage
        }
    }

}
Now, simply call this method, present your system UI, and then restore your original style when it’s done—and your system UI will look as it’s supposed to:
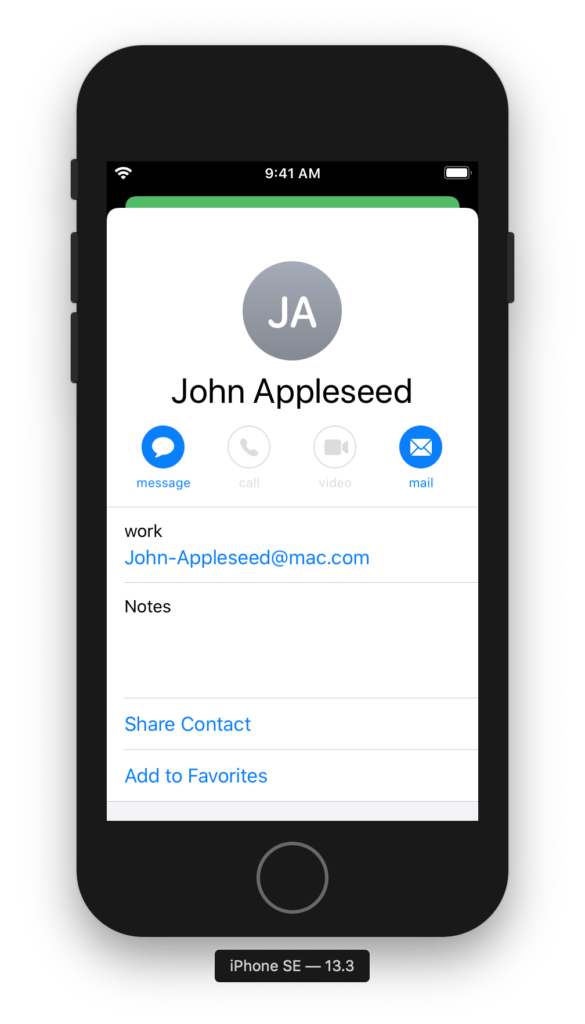
Obviously, this is a lot of code, but as there’s no built-in way to reset to a standard UIAppearance, this is the best I could do for now. You’d have to write one of these for every UIKit class that’s giving you problems in system UI, but this approach lets you have your UI customization cake and eat it too.
Another year, another AltConf! This year’s was fantastic and I had the pleasure of presenting again about dates and times. You can find the slides at Speakerdeck, and download the sample code in a Playground here.